Get the Repo
- Create an account on GitLab.com and sign in.
- Navigate to https://github.com/RedGuides/openvanilla
- Click Fork
- If it prompts you for a namespace, choose your account
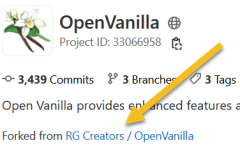
- It will fork and you’ll be looking at something that’s pretty much identical to what you were just looking at. Note that the project ID will be different and you’ll see the fork information:
- On this new project, go to Settings in the left hand menu and choose “Repository”
- Under the heading “Mirroring Repositories” click the “Expand button and enter the following settings:
- Git Repository URL: https://github.com/RedGuides/openvanilla.git
- Mirror direction: Pull
- It’s a public repository so you don’t need authentication information
- Click “Mirror Repository”
- It will take a few minutes to update and then in the “Mirrored repositories section you will see the status and when it last updated:
- You now have your own personal copy of the Open Vanilla repo.
Checkout your copy of the Repo
- You’ll need your repo URL for this, which you can get by going to Gitlab. Choosing Projects -> Your Projects, and then selecting “YourName / OpenVanilla” – make sure you do the one under your account and not the one under RG Creators. Once you click on it you should see YourName > OpenVanilla > Details at the top. Click the “Clone” button and copy the https URL. (In the screenshot it will show my name, but you want your name):
- Clone this URL into a local repository using your tool of choice. If that’s the command line:
- git clone https://gitlab.com/YourNameHere/openvanilla.git
- (this would create a folder in the folder you’re in called “openvanilla”
- Go into that directory, you’ll be on the “redguides” branch
- cd openvanilla
- git branch
- (This will show * redguides – the branch you are currently on)
- You don’t ever want to commit to the redguides branch because that will break your sync with RedGuides (“upstream”). If you commit to the redguides branch, when the GitLab updater tries to sync you it will see that you updated and RG updated and it won’t know how to reconcile that. So just create a new branch to work out of.
- git pull
- (This makes sure you’re up to date, if you just cloned you don’t need to do this)
- git branch mydevbranch
- (It’s a good idea to name your branch for whatever you’re working on. If I were working on MQ2MyButtons I would name the branch something like “devMQ2MyButtons”)
- git checkout mydevbranch
- (This puts you on the branch)
- git branch
- (You can use this to check what branch you’re on, the * should be beside the branch you just created).
- git pull
- Now you’re ready to modify the files just like you would normally. Perform commits as needed to your branch. Merge into your branch as OpenVanilla updates, all of that is beyond the scope of this. When you’re ready to merge your changes with RG, you’re going to git push
- git push --set-upstream origin mydevbranch
- (here, again, replacing mydevbranch with your actual branch name. This is going to create a branch on the GitLab server with the branch that you have locally)
- (You’ll need to enter your gitlab credentials to push and then you should see your branch on the GitLab.com site)
- git push --set-upstream origin mydevbranch
- You can have as many branches as you want to have. A good practice is to use one branch for each plugin or feature that you want to add so you can keep your development efforts contained.
Submit Your Pull Request (PR/Merge Request)
- Once you have committed to your branch, you’re ready to submit a pull request.
- Log into GitHub and select your project. On the left hand menu choose “Merge Requests”
- Click New Merge Request
- Your repo should be the default Source Branch and the upstream repo (redguides/openvanilla) should automatically be the Target Branch.
- Select the source branch that you want to merge from (the one where you did your changes).
- Your Target Branch is likely going to be “redguides” since that is what we publish RG from.
- Click “Compare branches and continue”
- Give your merge request a descriptive title. “Add X feature to X plugin”
- Give your merge request a description – this is usually where you will write anything that reviewers need to be aware of and what your changes are.
- Under Merge options, I usually select both options:
- Delete source branch when merge request is accepted.
- This will clean up the branch in your fork when RG accepts the merge request. If you’ve setup mirroring, you won’t need that branch anymore since once the request is merged to branch redguides, it will get mirrored back to you in “redguides”
- Squash commits when merge request is accepted
- This allows you to make commits and changes while waiting on the PR to be merged while keeping the commit history to a single commit.
- Delete source branch when merge request is accepted.
- Click Submit Merge request
Last edited by a moderator:


